Inkypinky Inks

Create. Dream. Inspire. Love.

Thursday, May 31, 2007

Birthday Hooray...


I just love this set...that little raccoon just cracks me up! I am so sad to see this set retire after only 1 year. I came across this incredible layout in the Splitcoast gallery and just had to case this card from Madelinesmom03, check out her card here. As you can see, I didn't change much. Her card is just awesome.

For the print pattern background I stamped it in blush blossom and then edged it with the pretty in pink marker, spritzed the stamp with water and stamped it onto blush blossom cs...gives it a nice water colour effect.

Stamps: Hip hip hooray, print pattern bg, dotted bg, riveting and small oval stamp (Amuse). Inks: chocolate chip, blush blossom, cool Caribbean, pretty in pink marker and more mustard (watercoloured with blender pen). CS: cool Caribbean, blush blossom, chocolate chip and whisper white. Accessories: blender pens, paper piercer, mat pack, white gel pen, stickles, and circle punch.

Monday, May 28, 2007

Peek-a-boo baby girl...


I love this baby set "baby talk". It is just so cute and images are so fun and whimsical. I was so excited to use my "new" houndstooth bg. The bg is retired but I went on a mission to hunt it down and was so excited to receive it on a trade. I knew this bg would be perfect for baby cards!

To make the baby peek out I stamped her onto whisper white using basic black ink. Coloured her and cut her out. I then stamped the stroller in basic black onto whisper white. Using my Xacto knife I made a slice through the main image and slid the baby into the slice so she is peeking up.

To make the canopy of the stroller interactive and moveable I stamped the stoller again onto pretty in pink cs, cut both pieces of the stroller out and glued the bottom piece of the stroller down but, attatched the canopy only with a brad so that it will move up and down, and the baby can peek out.

Stamps: Baby talk, houndstooth bg. CS: pretty in pink, whisper white, barely banana. Ink: Basic black, pretty in pink, blush blossom (sponged around main image edges), barely banana and pretty in pink markers. Accessories: flower brad (Making memories), pink grosgrain (non SU!, linen thread.

Friday, May 25, 2007

Waterfall of frogs...


Once again, trying fun new projects and I couldn't resist trying a "waterfall card". Super cute and very easy to do! I used the tutorial from Splitcoast. I can't add a link to it right now as the site is having some issues and I can't get onto it at the moment!! (you can find the tutorial under resources, and under projects).

Stamps: Unfrogettable, canvas bg. Inks: Basic black, versamark, certainly celery marker, cool caribbean, real red, creamy caramel. CS: gable green, real red, tempting turquoise, whisper white. Accessories: clear emboss powder, googlie eyes, crystal effects, white gel pen, cropodial, eyelets, gingham ribbon.

I love the texture from embossing the canvas over the cs, it is such an eye catcher.

Thanks for stopping in!

Wednesday, May 23, 2007

Twisted racoons...


This is my first trial at making a "twist" card...very interesting! I used the tutorial off Splitcoast, you can view it here. Quite a fun, interactive card but I wish I had the patience to add more layers...seems a little plain to me...lol. I used the bg stamps to paper piece and make little shirts for these little guys...(not an original idea as I have seen it done in the Splitcoast galleries many times).

Stamps: Hip hip hooray, paisley bg, houndstooth bg, canvas bg, dotted bg and amuse oval. Inks: elegent eggplant, basic black, certainly celery, taken with teal. CS: Elegent eggplant, whisper white and certainly celery. Accessories: Su! grosgrain ribbon.

The backside of the flip part has the sentiment "hip hip hooray, it's your special day" and the little mouse girls stamped.

Thanks for checking out my blog!

Tuesday, May 22, 2007

loss of a child sympathy card...


This was my biggest challenge to date. Making a sympathy card is hard enough but when it is for the loss of a child I think it is that much harder. I was asked by a friend to make her a card with this subject and after a whole day of racking my brain this is what I came up with. I found the poem online and as soon as I read it I knew it was perfect.

Stamps: Summer by the sea, canvas bg, warmest regards (inside card). Inks: Basic black, buckaroo blue, so saffron, creamy caramel (with blender pens for watercolouring). CS: kraft, buckaroo blue, natural ivory. Accessories: linen thread, distresser, blender pens.

Poem reads:

"You'll see me in the morning frost, that mists your window pane.

That's me in the summer showers, I'll be dancing in the rain.

When you feel a little breeze, from a gentle wind that blows. That's me, I'll be there, planting a kiss upon your nose.

When you see a child playing, and your heart feels a little tug, that's me, I'll be there

giving your heart a hug.

So Daddy, please don't look so sad, Momma don't you cry.

I'm in the arms of Jesus and he sings me lullabies". ~unknown

Thanks for stopping in!!

Monday, May 21, 2007

Hip, hip sub...


I wanted to try my hand at making a feminine card using the "by sea" set. Originally this was supposed to be a gel card but, I ran out of the bags to hold the gel so, that idea was out...lol. (I have since purchased more bags so I may have to try this one as a gel in the future).

Stamps: By sea, canvas, hip, hip, hooray. Inks: pretty in pink, basic black, cool Caribbean. CS: certainly celery, pretty in pink, whisper white and creamy caramel (for the sand). Accessories: soft subtles buttons, brads, glue dots, linen thread.

Overall, I am pleased with how this card turned out and I love the spin on it with the feminine colours. Thanks for stopping in!

Friday, May 18, 2007

wish BIG...


I pulled out my "think big" set and decided to play with it a bit. Boy, I sure hope this set makes it into the new catty!! That would be just too great!

Stamps: think big, paisley bg. Inks: White craft, basic black, pink passion, so saffron. CS: cool caribbean, pink passion, so saffron and whisper white. Accessories: non SU! ribbon, circle punch, dimensionals.

To get the scalloped border I simply punched circles out of cs using the circle punch and glued them so half of them were showing. Very simple and fast. This card folds at the top, so the bottom opens. Measurements: 4.25X11, scored at 5.5.

Thanks for checking in!

Tuesday, May 15, 2007

Submarine gel card...


This was my first time doing a "gel card"...I seriously thought it was going to be so much harder and more time consuming than it really was. Personally, the hardest part was finding the small size little zip lock baggies that you use for this project. I used the tutorial on Splitcoast, you can view it here.

I had to "hunt" this set down on Ebay because I did not purchase it from last years Summer mini...(I knew I should have ordered it when I contemplated again 2 days before the end of the mini...why fight our shopping urges...ha ha ha). I am naturally drawn to any beach, ocean, lighthouse, water type images...maybe because I live so close to the ocean?? I was inspired by a card in Mytime's beautiful gallery, you can see her card here.

Stamps: By sea, it's your Birthday. Inks: real red, yo-yo yellow, gable green, cool Caribbean, taken with teal. CS: real red, yo yo yellow, gable green and whisper white. Accessories: dimensionals, linen thread, eyelets, dimensionals, plastic bag, and hair gel.

Thanks!

Monday, May 14, 2007

Birthday Lion...


I needed to make a Birthday card for a friends son for his 3rd Bday. I happened to see this super cute card by ked and it just sparked my creativity.

Yes, I actually took my markers and coloured each dot on the dotted bg...how could I not? Just look at the awesome effect. I just love it!

Stamps: Wild about you, it's your Birthday, small oval stamp (Amuse), dotted bg, and weathered bg. Inks: old olive, more mustard, creamy caramel, basic black, sahara sand and certainly celery, appricot appeal, bashful blue markers. CS: whisper white, old olive, buckaroo blue. Accessories: non su! grosgrain ribbon, dimensionals, horizontal slot punch, giga scallop circle punch, and mega circle punch.

I love this cute little set. So handy for birthday cards and baby cards too! Thanks for popping in!

Sunday, May 13, 2007

pink polka dot boots...


LOL...are ya getting sick of seeing this set yet?? This is the last for a while I promise....I think these little boots are just so sweet and perfect for Mother's Day cards.

Stamps: Flower filled, warmest regards (hostess set), Karen Foster 1/8" snap stamps. Ink: regal rose, cool Caribbean, pretty in pink, certainly celery, close to cocoa (for the mud on the boots). CS: pretty in pink, certainly celery, whisper white, loves me designer paper. Access: celery grosgrain, tiny tag, linen thread, and white gel pen.

I hope everyone had a wonderful Mothers Day!!

Cheers!

Saturday, May 12, 2007

These boots are made for walking, and that's just what they'll do...


Lol, eveytime I play with this boot set, I always think of this song...lol. I got a lot of inspiration for this card from a fellow demonstrator. I changed a few things on this layout to make it mine and one of the stamp sets as well. But colour combo was purely hers. Thanks Jaime!

Stamps used: Flower filled, seeing spots and 1/8" karen foster snap stamps. CS: natural ivory, sage shadow, blush blossom and vellum cs. Inks: bashful blue, pretty in pink, barely banana, sage shadow. Access: brads, non SU pink grosgrain ribbon, tag, hemp twine.

I can't believe that the flower filled set is retiring...I just purchased it so am now desperately trying to give it some good use...lol.

Thanks for checking out my blog!

Thursday, May 10, 2007

Mother's Day magic slider...


I love making these fun slider style cards. I pretty much cased the layout of this one from a previous S10 group I attended. They only thing I changed was the stamp set and the sentiment.

Stamps used: Best blossoms (retired), Looks like Spring and it's your Birthday. CS colours used: mellow moss, perfect plum, whisper white. Inks: elegent eggplant, pale plum, pretty in pink, mellow moss, and so saffron. Access: moss gingham ribbon, versamark ink, winter white emboss powder, dimensionals, colour spritzer tool and horizontal slot punch.

I think these cards make such an impact on anyone who receives one, they are just so different.

Tuesday, May 08, 2007

Loves me one sheet wonder cards...


This was my first time doing a one sheet wonder (osw) and it really is fun and an effective way to get a lot of cards done quickly! I used the template from the Stampin' up website (for demo's).

For the first grouping of cards I stamped the canvas bg onto each card base in the matching colour ink. (pretty in pink, cool Caribbean and close to cocoa). For the main images I stamped "flower filled" onto whisper white cs using certainly celery, rose red, cool caribbean and pretty in pink ink. I used the horizontal slot punch, some moss gingham ribbon, a non Su! brad, and a tiny tag.


For the second group I used cool Caribbean as the card base, stamped the main image onto whisper white cs, rose red "dipped" into close to cocoa (for mud), certainly celery, pretty in pink and cool Caribbean ink. I matted the main image in close to cocoa cs. I used non Su! pink grosgrain ribbon, and paper pierced around the main image. stamp sets used were: flower filled, blossoms abound (sentiment) and everyday flexible phrases (sentiment).


For the third group I used close to cocoa as the main base. Mattted the pp with pretty in pink cs and added some grosgrain ribbon. For the main image I stamped the Big blooms in cool Caribbean ink and pretty in pink ink (cut them out and adhered them onto dimensionals). I distressed the edges with choc. chip ink and stamped "happy" from the polka dots and paisley set.


For the fourth group I used pretty in pink, cool Caribbean and close to cocoa for card bases. I stamped them with the weathered bg in versamark ink and crystal clear emboss powder. I stamped the main image in each card base colour (dipped them in close to cocoa for mud) and using my white gel pen gave them polka dots. I added a little tag that says "mom" tied onto the flower bouquets.

For the last group I added a strip of cool Caribbean cs to the top of the pretty in pink base. I stamped the "big blooms" in choc chip ink onto close to cocoa cs (cut out). I stamped the centers in rose red ink (cut out), add celery grosgrain ribbon and dimensionals to each layer of the flower. I stamped "happy" from the "happy everything" set.
Thanks so much for checking in!


Friday, May 04, 2007

Folded paper brag book tutorial


Okay, this is my first ever tutorial so be gentle on me....lol. Once again, this is a project we learned at the Vancouver regionals. This is NOT my design, but sooo darned cute I felt it needed to be shared. So this is my hand at trying to teach it.


Start with a double sided piece of designer paper 12X12. Fold it diagonally so it is a triangle shape. Use your bone folder to get a nice crisp edge.


Then, fold it in half (hotdog style) Vertically.


Next, fold each side up to the center fold (sort of like cupboard doors)


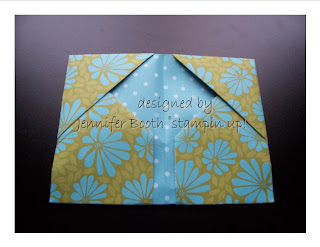
This is how your project should look so far...


Now, you need to fold the edge (vertical) up about 1/4" on both sides so now, your cupboard doors when closed will have a space between them like so:


Now, open your paper up and fold in the corner edges to the first fold line to make little triangles (almost like when you fold a paper airplane)...


Now, fold your "cupboard" doors closed again and they should look like this:


Now flip your paper over and fold up the edge just so the "v" shape is visible (roughly just over 2 3/4" in measurement or so).


Now tuck the opposite side into the flaps of your newly folded side, like so:


Once finished, fold in half and decorate as desired.


These are so sweet and I can't wait to fill them with photo's, gift cards or all sorts of goodies. I hope you enjoyed the tutorial.


Thursday, May 03, 2007

Folded paper brag book...


I learned this sweet little folded brag book technique at regionals this past weekend....and I love it!

I used the Spring flowers designer series paper, the "looks like spring" set (which I rock n' rolled using pretty in pink and so saffron ink), moss grosgrain ribbon, clear buttons (which I backed with more designer series paper and linen thread), a mini tag and everyday flexible phrases, and looks like spring punch.

You would tuck your photo's in the little "v" section on both sides of the little book. I think this would make the sweetest Mother's day gift.

Tuesday, May 01, 2007

Patchwork brayer technique...


I learned this fun technique at one of the first of my stampers 10 classes. I decided to give it a shot on my own and used the NEW "double line doodles" set I received at the Vancouver regionals last weekend!!

To re-create this fun look I stamped my images onto a piece of glossy cs using basic black ink. Then, using my brayer I layered on pretty in pink ink all over. I took some post it notes and cut them into different sizes and widths and only covered my main images (the larger ones). Then I brayered on some cool caribbean. I added on some more different sized post it's (be sure to leave on the first set as well!) Once satisfied that I had enough post it's covering the surface in a fun and random matter I layered on the real red ink. I left it to dry for a few minutes and then peeled off all the post it notes. Using my white gel pen I coloured in random doodle areas and added some stickles for some fun. I layered the main panel onto real red and pretty in pink cs. The only addition I would like to add would be some silver cord but, I don't have any yet so I will have to wait...lol.

Thanks for checking in!