Inkypinky Inks

Create. Dream. Inspire. Love.

Thursday, November 30, 2006

It's starting to look a lot like Christmas.....


Everywhere you go....lol. Wow, lot's of snow here. I love how everything looks blanketed in a white coat of fluffy stuff. Just beautiful!
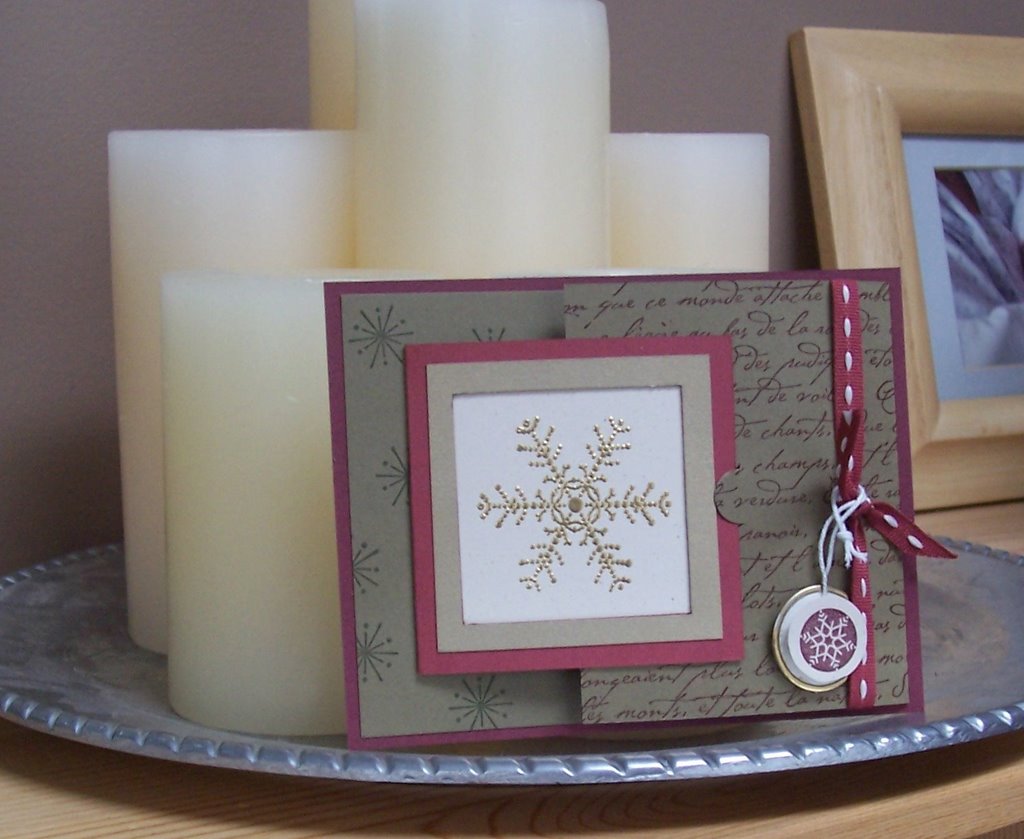
I started playing with the lovely as a tree set. I have seen so many beautiful samples with this tree used as a Christmas tree in the Splitcoast galleries that I had to try my hand at one. I started by stamping the tree in Old olive ink and used my choc. chip marker to add some brown to the tree trunk to add some depth. I used embossing powder on some of the boughs to make them glittery. (I wish I had some liquid applique, but am still trying to find some around here. I did hear that Michaels has some called "snow writer" so I will have to check it out next time I am down there). I distressed the edges with Van Dyke brown by Nick Bantock distress ink. Matted it on true thyme and cranberry crisp cs and popped it up on dimensionals. The base of the card is true thyme cs stamped with always artichoke ink using the French script background. I love the look of this bg, so elegent! I added a piece of the Christmas designer paper and tied a piece of the stitched grosgrain ribbon and matted that onto cranberry crisp cs. Using my Karen Foster snap stamps I did the sentiment "be merry" and cut it out into the shape of the word window (man! I need to buy that punch soon...lol) and adhered it with a brad.
I am not sure if I like the sentiment and am patiently waiting for my riveting set to see if I can use one of those and get a better look. Thanks for checking out my blog.

Thursday, November 23, 2006

Shimmering Posies


I was in the process of making this card when last nights disaster struck. A Birthday card for my Mom. I wanted a bright and cheery card for her seeing as her Birthday is early December. I borrowed polka dot posies set(from the spring mini) from my friend during the summer and made this one piece on glossy cardstock and then dipped it in versamark and covered it in sparkly emboss powder. I wish the camera could pick up how sparkly this really is, it's gorgeous. I never used the image until now. I matted it on rose red cs (the posies are stamped in elegent eggplant, so saffron, mellow moss and rose red ink). The card base is eggplant and I stamped dots and daisies bg (spring mini) in eggplant ink for the background. I mounted my last scrap of so saffron cs stamped in canvas in so saffron ink. Added the sentiment (Happy everything...love this set!!) and mounted the birthday portion on moss and rose red cs, added some brads and popped it up on dimensionals. I added some gingham ribbon (moss) and I think it finished the card off nicely.

I can't believe it....

Let me just start by saying " Do not put drinks on your work surface!". I had to learn this lesson the hard way last night. I very rarely have drinks on my desk and last night was a exception. Guess what? Yup, my glass of water spilled all over my Christmas cards!!!! After rescuing what I could, I walked out bawling my eyes out, came back in to assess the damage. Not good. 8 are completley wrecked! I guess it could have a lot worse as I did manage to get a stack out of the way of the water. The water went all down the back and under my desk. 3 of my scrapbooks were wet, thank goodness the page protectors saved my work and only a few of the covers were a little more wet than I would have liked. What a mess!

So, once again....Do not create with drinks on your work surface!! It only brings heartache in the end.

Wednesday, November 22, 2006

Whew!


Like most of you I have been plugging away at the Christmas cards. I think I am being buried alive by Christmas cards. All these cards (not including the 14 I have made before these ones for challenges and what not) and I'm still not done! Just wanted to give a view of my desk...lol. The LO of this card is almost bang on from my last post. I changed only the hardware for a tag and colours.

This card is really pretty up close. The mellow moss layer has weathered bg stamped onto it for texture. The snowflakes on the main image has sparkly sakura gel pen on the points, centres and on the little star on the tag (so pretty). The little snow area on the tag has icicle stickles on it to match the sparkly feel of this card. Much nicer irl. I don't want to post any close ups of these cards yet as some recipients may be reading (you will have to wait...lol).

Saturday, November 18, 2006

Storm of the century??


I think I may have just been involved in it. Seriously, we were hit with a very scary storm and lost power on Wednesday morning. Power was just restored to us early morning today (Saturday). I have never witnessed anything so terrifying winds were up to 110/hr the lowest they got during the storm was 90/hr I believe. Huge, healthy trees were toppled over like toothpicks. Tree's all over the roads and power lines. Power poles snapped off...it was truly scary.

Needless to say, I did not get any cards or anything made during this madness and aftermath. I did finish this card tuesday night but was unable to upload it so, here is something to share.

I used the colour challenge from Splitcoaststampers (elegent eggplant, certainly celery and bordering blue). I pulled out my snowflake spot stamps (I am in love with this set as I am sure you can tell) and seeing spots. I stamped the snowflakes in eggplant and bordering blue and then added the spots using celery. I matted it onto bordering blue cs. The base of the card is eggplant with snowflake stamped in the corresponding ink. Certainly celery cs on the lower half of the card with snowflakes and weathered background (stamped off once) in celery ink. I layered a tiny bit of bordering blue cs peeking up from below the celery cs as a little border and to add some interest. I wrapped vintage violet stitched grosgrain ribbon across the main image and added a bookplate with "Joy" embossed in silver. And, that is all she wrote.

I am trying madly to get my Christmas cards done but, still have a long way to go. Very different colours for Christmas but very pretty I thought!

Saturday, November 11, 2006

mmmmm...


What yummy colours together. I got this colour combo from Tanya's card on Splitcoast, and used the sketch challenge again. (it's such a great sketch I wanted to try a little something different with it).
Broke out the snow flake spot and snow flurries sets for this one. (I love these sets!) I started with a vintage violet base and stamped snow flake on it in matching ink. Stamped snow flurries in vintage violet and cool caribbean ink, added some versamark and sparkle embossing powder (Unfortunately you can't see any of the glitter in the photo). Matted this piece on a light beige cs I picked up at M's. Rock n' rolled the main image in vintage violet and caribbean ink. Then re-stamped it in versamark and heat embossed it to make it glittery. Matted on violet cs and put up on dimensionals, added some stitched grosgrain to the caribbean piece and that's it.

Wednesday, November 08, 2006

What a great sketch challenge...


For the sketch challenge on Splitcoast this is what I came up with...
I started with a creamy caramel cs base and then mounted close to cocoa cs stamped with canvas in cc ink. I added some crate paper (yummy) and also the reverse side of the patterned paper too. For the main stamped image I stamped in choc. chip ink on glossy cs. I did the crayon resist technique on the water and sponged creamy caramel all over the image. I sponged the edges in close to cocoa. I then stamped linen over the image in creamy caramel (but stamped off so the effect would be very subtle). Mounted the image onto choc. chip cs. Stamped "happiness" using my choc. chip marker onto the twill tape. I still felt the card needed a little something so I set the main image up on dimensionals, did a little paper piercing in the upper corner and added a couple of brads in the bottom corner. Simple but sweet I thought. I just love this set and couldn't wait to play with it, I just got it from a trade. Thanks for reading!

Monday, November 06, 2006

Cool Floral...


Look at this yummy colour combo from the colour challenge. I started with a cool caribbean base and stamped it with the weathered bg in chocolate chip (I stamped off first so the colour wouldn't be too dramatic). The main images I used the looks like Spring set and did the trio of flowers in cool caribbean ink, choco chip ink and so saffron (was supposed to be more mustard but I don't have that ink pad yet, so I had to substitute). I rock n' roll the main blossom and cut it out, mounted the single flower image from the set into the center and adhered with a brad. That is boosted up on dimensionals. I added the outline diamond bg from LLS set inked up in creamy caramel and stamped that over main image. Added a small sentiment with Karen Foster stamp snaps (1/8" size), some chocolate grosgrain ribbon and this puppy was complete. I adore this combo and can't wait to try it with more mustard ink.

Saturday, November 04, 2006

It's that time of year...


Oh yes, Christmas is coming and those shopping carts will be rolling. In the limited supplies challenge on Splitcoast the challenge was to use "time" (or your interpretation of it) on your card. So, I figured hows about Christmas shopping time...lol.
I started by stamping the cart from the wheel thing in versamark and embossing it in silver. I used my trusty stamp-a-ma-jig and added the tree from loads of love and some presents from loads of love accessories. Coloured them with prismas, and inked the edges with bordering blue. I used buckaroo blue for the card base and used this deliscious patterned paper from Scrapworks. I mounted old olive and cranberry crisp under the main image, tied a little twine in the corner. I used my 1/8" snap stamps by Karen Foster for the sentiment. ("it's that time of year again"). I cut them out into strips and rounded the edge to make it resemble the word window (which I haven't bought yet but really need to), added some brads and "voila" done like dinner!

Friday, November 03, 2006

Totally Retro...


I found this adorable stamp at a LSS when I was wandering around. Catch my eye it did...lol. A Must have! The stamp is from Inkadinkado.

I stamped the image in close to cocoa ink onto natural ivory cs, scuffed up the edges and distressed the colour using walnut stain by Tim Holtz. I matted the main image onto chocolate chip cs and some green ( I found in my scraps and do not know the colour name or who makes it, but it matched the stripes in the Wild Asparagus paper perfectly). The base of this card is close to cocoa cs and then I mounted some polka dot WA paper and zig zag stitched across the top and bottom. I added this gorgeous striped paper from WA (don't you just love their paper? So thick and luxurious) mounted on chocolate chip cs. I added a zig zag stich from top to bottom along the right side of the paper as well. I finished it off with a photo turn from 7gypsies and tied on a little gingham ribbon. Added a gorgeous blossom from Prima (drool, drool) and put a biggie brad from Making memories in the center ( this brad really tied into the retro image I thought).

Thursday, November 02, 2006

Here we go...


Well, I have contemplated and wondered about starting a blog. I finally decided to give it a shot. I am seriously about the most computer illiterate person out there so it will be interesting to see where this goes...lol. There are so many stampers that I admire and read their blogs daily that I figured I would try my hand at it. (I bet my Dad is proud...he is the computer genius in the family).

Anyhoo, here is a card I worked on this afternoon. I took part in a challenge on www.splitcoaststampers.com (my favorite website ever!!). I actually combined two of the challenges (the sketch challenge, which you can see here http://http://www.splitcoaststampers.com/forums/showthread.php?t=191999 and ways to use it challenge, which you can see here http://http://www.splitcoaststampers.com/forums/showthread.php?t=195706.

I started with bravo burgundy for the base and then mounted Stampin Up's new in colour true thyme. I stamped the tt with French script in bravo burgundy ink and the other side of the cardstock (on the other side of the stamped snowflake image) in always artichoke ink using the snow flurries set from the Holiday mini. I mounted cranberry crisp with the gold cardstock and punched a hole in both pieces to layer the embossed snowflake from the snowflake spot set. (hence the window for the challenge). I used the Basic Grey notch and die cut tool to put in a closure so the layers will stay closed on the card. I finished the card off with some cranberry crisp stitched grosgrain ribbon and a small circle tag. I embossed the edges of the tag with gold embossing powder and mounted a snow flurrie stamped in burgundy on dimensionals.

This is such a fun fold and I know I will be using this one in the future. The measurements for the folds are: the burgundy base layer is 4.25X5.5, true thyme layer is 8.5X4 and scored at 3.25, the cranberry layer is 6X3 and scored at 3".

Well, off to learn more about the world of blogging!