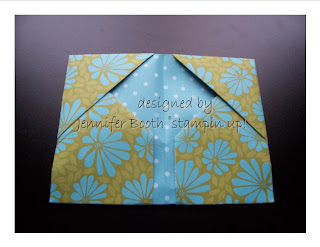
Folded paper brag book tutorial
Okay, this is my first ever tutorial so be gentle on me....lol. Once again, this is a project we learned at the Vancouver regionals. This is NOT my design, but sooo darned cute I felt it needed to be shared. So this is my hand at trying to teach it.

Start with a double sided piece of designer paper 12X12. Fold it diagonally so it is a triangle shape. Use your bone folder to get a nice crisp edge.
This is how your project should look so far...
Now, you need to fold the edge (vertical) up about 1/4" on both sides so now, your cupboard doors when closed will have a space between them like so:

Now, open your paper up and fold in the corner edges to the first fold line to make little triangles (almost like when you fold a paper airplane)...

Now flip your paper over and fold up the edge just so the "v" shape is visible (roughly just over 2 3/4" in measurement or so).

Now tuck the opposite side into the flaps of your newly folded side, like so:

These are so sweet and I can't wait to fill them with photo's, gift cards or all sorts of goodies. I hope you enjoyed the tutorial.


6 Comments:
At 4:05 AM, Anonymous said…
This is a great tutorial, totally made sense! Thanks for sharing!
At 5:53 AM, Dawn Easton said…
For your first tutorial...it was AWESOME....you know...now we will be expecting more from you ;)
Thanks for sharing this!!!
At 2:12 PM, Pattyjo said…
Thank you so much for the cool tutorial! I am going to try this one for sure!
At 7:17 AM, Jenn D said…
Thanks so much for writing this up and taking the time to show the pictures as well. I will have to give this a try.
At 5:22 PM, Anonymous said…
Thanks for sharing Jen. I was at Vancouver Regionals, and when I got home and took out my sample, it made no sense at all....lol It was too quick to make the sample and take notes for me.
At 5:23 PM, Anonymous said…
Thanks for sharing Jen. I was at Vancouver Regionals, and when I got home and looked at my sample, it wasn't making sense. Your tutorial is amazing!!!
Post a Comment
<< Home