Inkypinky Inks

Create. Dream. Inspire. Love.

Wednesday, January 31, 2007

Elephants on parade...


I whipped this up for the sketch challenge on Splitcoast. As soon as I saw the sketch I thought of elephants across the strip and started thinking about "elephants on parade"...lol. So I stamped the elephants in pretty in pink on whisper white cs, I wanted to add some orange elephants too, so used pumpkin pie ink. At this point I wondered to myself what kind of colour combo could this possibly be. So, I jumped onto the colour combo website. This site is just awesome. I entered the two colours I knew I wanted to use (pretty in pink and pumpkin pie) and then hit search...it came back with those 2 colours, green galore and ballet blue...what do ya know?? those colours rock together!! Soooo... I added a little party hat for the one pink ele in ballet blue and matted the strip onto ballet blue cs. Used a green galore card base and stamped the dotted bg in the matching ink. Added some green gingham ribbon from the dollar store and used a tiny metal rimmed tag from Making Memories. For the tag I stamped "birthday" from everyday flexible phrases in green galore ink and tied it onto the ribbon. For the finishing touch I stamped "happy" from the happy everything set in basic black so it would really stand out.

I hardly ever use bold bright colours and really had fun with this one. Thanks for looking and happy stamping!

Tuesday, January 30, 2007

Dazzling Eskimo...


I made this little cutie for the Splitcoast colour challenge, CC99. (Night of Navy, taken with teal and whisper white). I started with a night of navy card base, matted a panel of whisper white cs which I stamped "snow flurries" in teal and navy ink. I stamped the main image from "polar pals" in navy ink but masked her little face and used my choc. chip marker. I used by 2 way glue pen and dazzling diamonds for her fur trim. (I got this idea from my friend Tanya...Thanks!). I matted her on navy and teal cs and then used my sewing machine to sew a wavy border around the matting to add some visual interest. I added a little ribbon and popped the main image on dimensionals and that's it. I adore this little eskimo stamp...every time I see her she makes me smile...to darn cute I guess.


Thanks for checking in!

Monday, January 29, 2007

Shadow blossoms...


For the technique challenge on Splitcoast we are making shadow box cards. I have never tried this tech before so thought I would give it a try. I think it was a fun and very cool looking tech. Directions on how to actually make this card is right on the technique challenge post. (very easy to follow and do).

For mine, (on the inside) I used whisper white and stamped "blossoms abound" in perfect plum and pale plum ink. the leaves and stem are in mellow moss and artichoke (stamped off so not too heavy) ink. I sponged the surrounding area around the blossom in creamy caramel ink to add some warmth. For the outside layer I used perfect plum cs stamped in canvas with elegent eggplant ink. I stamped some leaves in mellow moss ink onto the corresponding cs, cut them out and mounted them along the focal point window. Tied some pretty organdy window and then hung a little tag with a jump ring. For the tag I stamped "grateful" from small script in eggplant ink onto whisper white, matted with pale plum.

In the photo you can't really see the depth but, there is a window cut and the card truly is a shadow box.

I used the blossoms abound just for you Tanya!!! LOL....hope you like =)

Saturday, January 27, 2007

Sweet Tea


I first seen one of these "tea cards" at a stampers 10 I attended, and they are so cute, I wanted to make one to send to my Grandma for a quick little Valentines "Hi".
To make this, I started with a 8 1/2 X 3 1/4 piece of cardstock. (I used a brown scrap piece I had laying around, so it is not SU! but a similiar colour to close to cocoa). You score it at 1" and again at 4".

I added a piece of the new "loves me" pp for the background. I stamped the "sweet" in regal rose ink onto whisper white cs and mounted it onto by brown cs, clipped the edges using the ticket corner punch and mounted again onto regal rose cs. I attached some white eyelets using my cropodial, and mounted it over some May Arts ribbon. The "sweet center piece is raised on dimensionals. For the sentiment " For my Valentine" I used my Karen Foster snap stamps (1/8" casual font) and stamped it in choc. chip ink. I took an individually packaged specialty tea, and wrapped it in saran wrap (the little cellophane bags work perfectly but, I did not have any so had to make do...lol. I folded the 1" piece up ensuring that the tea bag was held in there and stapled it to secure it. Tuck the your main piece over like a match book and you are finished!!

Such a sweet little card/gift for someone special.
Thanks for stopping in...


Thursday, January 25, 2007

Marigold Harmony...


For the limited supplies challenge on Splitcoast. Ever since I seen this set I have been wanting to stamp the flowers in black for some strange reason. This challenge was the perfect opportunity. I stamped the blossoms in versamark onto whisper white cs and covered them in black embossing powder. I stamped them multiple times and did use my stamp positioner and a bit of masking. I matted the flowers onto black cs and also used black cs as my card base. I used the marigold morning cs and used the canvas background stamped in black to add some dimension. For the black canvas I stamped off and then used the walking my fingers technique so the canvas would look patchy and sort of vintage. I stamped my sentiment in basic black on whisper white as well and matted it onto black cs. I clipped all the edges with my ticket corner punch and threaded in some sheer white and blk polka dot ribbon. (Michaels...$1.50 for a spool!!). Overall, I am pretty impressed with how this turned out. The challenge was to only use black and white ink, and embellishments and cs had to be white and black and another colour of your choice.

Sweet heart...


I made this for Splitcoaststampers WT97 (ways to use it challenge). I have a friend who has a Cuttlebug so last time I was over visiting I did up some super cute embossing folder backgrounds. I am so in love with that little machine...so quick and fun! Anywhoo, I wanted to use the blooms and dots background, so I matted it on black cs (not SU) and adhered it to a real red card base. For the main image I stamped "sweet of you" the heart stamp in basic black onto whisper white cs, which had been punched out using the mega circle punch. I stamped the heart image again onto some Basic Grey pp (black tie line) and cut out the heart and mounted it onto the main image with a dimensional. I masked the outside design of the "sweet" stamp and stamped just the "sweet" phrase in Ruby red ink (I don't yet have the real red ink...lol). I did the same steps for the "I heart" stamp using only the "heart" phrase. I punched out a giga scallop punch circle in black cs and mounted the main image onto it, punched a hole in each side and added some ribbon and for a finishing touch took my gel pen and added a white dot onto each "scallop".


I think this will make a nice Valentines card for my darling Hubby!

Sweet on you...


I am just loving this new little set and the adorable "loves me" paper. As soon as I received my new rubbah I had to slice and dice it and play. So, I whipped up this tasty little valentine number. I started with a cool caribbean base and stamped the flower stamp (from "sweet on you" in matching ink and added some random tiny blossom stamps (from "wild about you", I just masked the stem). I used some of the new "loves me" paper and mounted it on the lower bottom part of the card. I tied on some yummy pink shear polka dot May Arts ribbon (which is refusing to stick to my card at the moment...lol). For the main image I stamped the "I heart" square in basic black on whisper white, roughed up the edges and hole punched and cut to make it look like I had torn it from a notebook. I mounted it onto regal rose cs. I came across these adorable mini clipboards from Rob & Bob and thought they would work perfect for this card. I attached the image onto it and then added a chipboard "U" which I had covered in pretty in pink cs, dipped in 2way glue and dipped into dazzling diamond glitter. For the top of the clipboard I cut a circle from the designer pp and stuck it onto dimesionals to make it pop. Overall, I am quite please with how this one turned out. I think I am gonna have a lot of fun with this little set.


Thanks for stopping in and checking out my blog!

Thursday, January 18, 2007

Chocolate plum cake?


I used the Splitcoast colour challenge CC97 (close to cocoa, pale plum and sage shadow). I needed to make a Birthday card for a friend who's Birthday is coming up. I wanted to use my "eat cake" set that I have not had too much time to play with.

I started with a pale plum base and stamped the print pattern in corresponding ink. For the main image I stamped my paisley background stamp in close to cocoa and then stamped the cake image onto it and then onto whisper white cs. I stamped the cake plate in sage shadow and the candles in pale plum and then cut everything out and mounted it onto close to cocoa cs and matted it with pale plum cs. I punched a little hole on each side of the cake plate and weaved through my May Arts ribbon and attached a little tag that reads "eat cake". I layered the main image over ribbon. For the scalloped edge I used my Basic Grey notch and die cutting tool. I cut the card edge about 1/2" smaller and layered the scalloped border so it peeked out. For the finishing touches I stamped the "celebrate" sentiment from my fun phrases set (retired) and just masked the words I didn't want stamped out. I added the "candle flames" by using a glitter pen from sakura (it is soooo glittery IRL). Pretty simple card but I think it turned out kinda cute.


Thanks for stopping in!

Wednesday, January 17, 2007

it's been a while...


Sorry, it's been so long since I have popped in. I have been very busy with work, family life and a new puppy!! We have opened our hearts and accepted an 8 month old Jack Russell Terrier named Maddie into our family. So, needless to say we have been busy...lol.


I did manage to finish up my daughters Birthday invitations. This morning I made up a Thank you card for the family we received our puppy from.

This one was a pain to get a descent photo of...I had a hard time getting the "steam" to show up!!
I started with a cool caribbean base and stamped paisley in choc. chip ink onto whisper white cs and mounted it onto choc. chip cs. For the main image I stamped the cup in cool caribbean ink and carefully wiped the center of the cup clean and used my choc. chip marker to fill the inside area of the cup and stamped it onto whisper white cs. I used a versamark pad to stamp the steam and then used a sparkly emboss powder to give the steam some shimmer. I stamped the heart in caribbean and popped it up on a dimensional. I then added the "thanks" sentiment using my Karen Foster snap stamps (1/8" size), mounted that onto choc. chip cs so it would stand out. I distressed the edges of the main image using Nick Bantock (van dyke brown) distress ink and mounted the works onto choc. chip and caribbean cs. Added some brown grosgrain and sheer organza ribbon (both non-SU!). Added the "a latte" sentiment in the corner, mounted on caribbean. That's it!


Thanks for checking out my blog and happy stamping!

Wednesday, January 10, 2007

Peaceful everything...


I wanted to make a few more cards using this set before I hand it back to my friend. I was inspired to make masculine card by Debbie's beautiful card . I contacted her to make sure I had permission to post my version of it...Thanks so much for the inspiration. Here is my interpretation of it.


I stamped the boughs in always artichoke onto natural ivory cs. (some of the boughs are lighter in colour, I did that by continuing to stamp without re-inking). I stamped the pinecones in choc chip ink and then cut one out and mounted it onto dimensionals. I stamped the weathered bg stamp over the main image using close to cocoa ink (stamping off once, for a lighter effect). I monted it onto choc. chip cs and corner ticket punched the corners and added some brads to finish it off. For the card base I used always artichoke cs and stamped canvas bg using the matching ink. I stamped "happy" from the "happy everything" set in basic black so it would stand out. I tied some jute onto the main image and then hung the little "everything" tag off with a jump ring. For the finishing touch I mounted the whole main image onto dimensionals to make it "pop".


I had to fight my instincts to add more and keep it simple for those guys in our lives. I originally wanted to add some paper piercing along the bottom but in the end thought it probably would not have been visible with the canvas bg so let it be.

Thanks so much for stopping by and happy stamping!

Monday, January 08, 2007

Holly hobby...


Lol, I don't know why but this stamp always reminds me of her...hee hee. Except this girl has a much classier hat than poor Holly Hobby did, ha ha ha! I wanted to do something serene and pretty (I originally tried to do something for the sketch challenge on Splitcoast but, after hours of fiddling with the card and not being happy I had to nix the circle theme). I started with a buckaroo blue base and stamped it with the canvas background in matching ink. I stamped the main image onto the patterned paper, cut out her dress. Stamped her again onto natural ivory cs in basic black ink and then mounted her dress back onto her. I watercoloured the rest of her (using the tops of the ink pads and a paintbrush). I mounted the main image onto true thyme cs, added a spiral clip and some moss gingham ribbon in the corner. I stamped the "dream" sentiment from the "think big" set in artichoke ink onto thyme cs. I mounted a book plate over the sentiment, added some more ribbon and a prima flower blossom for a finishing touch.


I had a hard time with this card. It kept sitting and sitting and just wouldn't come together for me. I must say I am glad I have it finished...and fairly happy with it too =)


Thanks for stopping in!

Saturday, January 06, 2007

Yahoo!!

Thanks so much Kristine for the suggestions! They worked! No more skinny column style type...ha ha ha.

Thanks again

Why?

Why in the world is my writing going down the page and not "wrapping" around the photo's like it was before?? I apologize to everyone for the type being so difficult to read. If anyone has any ideas as to why the writing is doing that suddenly please let me know...lol. It looks really yucky like this...

Really...I like you


Lol, I love those sentiments from the quick thinking set. Cracks me up everytime, ha ha ha. Had a little play session tonight and made this cute card using the "Polar pals" set. I stamped her in pretty in pink and used my choc. chip marker to colour her hair, face and boots; onto whisper white cs. I distressed the edges using antique linen distress ink from Tim Holtz and mounted it onto choc. chip cs. For the card base I used pretty in pink cs and decided to use up some of my patterned paper scraps (the pink gingham I cannot remember who makes it and the pink argyle is made by GinX). I mounted each panel of patterned paper onto choc. chip cs, added some more of that delicious pink/brown ribbon by May Arts and then stamped the quick thinking sentiment in choc. chip ink. I finished it off by using liquid applique on the eskimo's parka. Just a fun, quick card. Thanks so much for tuning in =)

Thursday, January 04, 2007

Party invitations...


I knew I wanted to make my daughters Birthday invitations using "hip hip hooray", I also knew I wanted to do a pocket card and I wanted to use cool caribbean, more mustard and choc. chip cs. I just had to sit down and let the ideas flow. I now have a finished product! I just need to make...ummmm...how many more?! UGH! lol, just kidding. I will have a few to make but I enjoy this sort of thing..(ask me how much I still enjoy it once I am done making them all...hee hee).


I started by making the pocket card using directions from Splitcoast in the resources section (wonderful tutorial by Beate). Once I had the pocket card made (in cool caribbean) I made the main image by stamping the racoon and beaver in basic black (I used my stamp-a-ma-jig (stamp positioner) to position them holding hands) and used my prismacolour penciles, gamsol and a stump to colour them in. Once again I used the stamp positioner to make the balloons different colours (caribbean, mustard, choc. chip) I added the confetti stamp to stamp the main image background in mustard ink. I cut the main image out and cut around the balloon as if it is popping out of the matting. I distressed the edges using Vandyke brown by Nick Bantock and then matted it onto choc. chip cs. I cut a strip of mustard cs and stamped it using the dotted bg in choc chip ink. I added some choc grosgrain ribbon along the top flap and tied on some orangey-mustard grosgrain ribbon I found cheap at Wal Mart. I stamped the "you're invited" sentiment from "eat cake" set in caribbean ink and mounted it onto choc. chip cs and then raised it onto dimensionals.


For the insert I cut some funky crooked strips of mustard and choc. chip cs (to mimick the invitation details stamp) so it would be visible popping out from the pocket. I stamped the invitation details stamp in caribbean ink onto whisper white cs and mounted over choc chip cs and roughed up both cs edges with my paper distresser. For the bottom of the insert I stamped a border using the gift and cupcake stamp alternating choc chip and caribbean ink. Added some ribbon to the top for a little pull tab and that finished it off.


I cannot believe how much I use my stamp-a-ma-jig. For anyone who is unsure...buy it! I bought mine off with a 40% off coupon from Michaels and it is almost the same as the one by SU! I never would have thought I would use it as much as I do. If you are unsure of how they work there is an awesome tutorial on Splitcoast to give you the hang of it.

Well, off to make some more of these....thanks for looking!

Wednesday, January 03, 2007

Looky-looky!!

With the help of my loving husband (actually, he figured it all out...hee hee) I now have a subscribe option on my blog! If you subscribe, you will be notified each time I post anything new :)

Yay!! Slowly but surely I am bumbling my way through this whole blogging thing...lol.

Eat cake...racoon style!


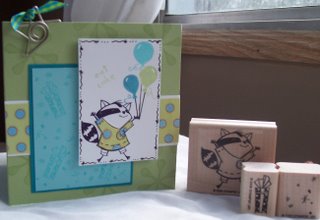
Lol, I love this little guy. He is definatley my favorite from this set. I just whipped this up using up some of my scraps. It is a 4X4 card. Base is certainly celery stamped in the same ink from the little flower/star from the "think big" set. I stamped the racoon onto patterned paper, cut out his shirt, stamped him again onto whisper white cs and glued his shirt on. I inked up the balloons seperately (I don't have these colours in markers yet so I had to do it the hard way...lol). Doodled a border around him and stamped the "eat cake" sentiment from the "eat cake" set in celery ink. I mounted that over a cool caribbean panel stamped with the gift and confetti stamp. I mounted it over taken with teal cs. I added a border in the same patterned paper as the racoons shirt, mounted onto white to make it really pop. I finished it off with a star clip with some teal/green gingham ribbon tied on.

Just a fun little way to use up some scraps. Thanks for looking!!

Wish big Giraffe...


I love all the things I have seen inserted into the "big" phrase instead of the "I" and wanted to do something a little different. I decided to put in the giraffe from the "wild about you" set. I used my stamp-a-ma-jig and also did some masking to put the giraffe in (stamped in more mustard). Added some chopped up cs for grass (I actually got the cute idea for grass off of Splitcoast from a very talented lady there...Mytime). The card base is cool caribbean cs stamped with "seeing spots" in matching ink. I used my new dotted bg and stamped a panel in pixie pink ink onto the matching cs and then matted it onto pink passion cs. The main image I matted onto certainly celery, ticket punched the corner and added an eyelet. I tied some funky fibres onto the bottom to finish it off, punched the "wish" sentiment in more mustard, punched it out and mounted it onto the matching cs. Stamped the little birdie in cool caribbean and she was all done!!

I made this for a friends daughter's Birthday. I hope she likes it...I think it came out pretty cute!!