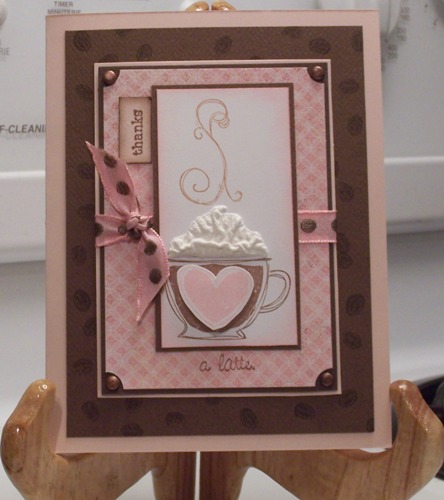
Inkypinky Inks

Create. Dream. Inspire. Love.

Saturday, December 30, 2006

Inspired by a bag??


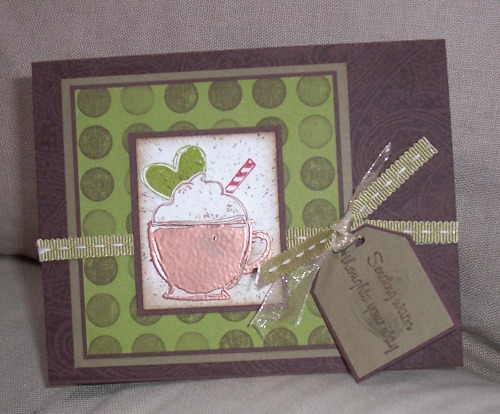
I made this little number after being totally inspired by my new supplies bag I received for Christmas (picture posted a few posts below). The colour is sooooo hot and I wanted to mirror it for this card. I started with a choc chip card base, stamped in choc chip ink with the retired paisley print bg stamp. I stamped the cup (from "like it a latte") in versamark and heat embossed it with a copper embossing powder. I stamped the whipped cream in close to cocoa ink, the heart in old olive and the peppermint stick in cranberry crisp ink and then cut them all out. I used the spritz tool with my choc. chip marker and spritzed the cup and accessories, and distressed the edges using Tim Holtz walnut stain distress ink. I popped the whipped cream up on dimensionals to make it look "puffy". I matted the cup onto choc. chip cs then layered it onto an old olive panel stamped with the dotted bg in choc. chip ink. I matted the dotted panel onto choc chip cs and true thyme cs. I then added some ribbon I found at the local scrapbook store and tied on a tag (in true thyme matted with choc. chip cs) using the tag punch, stamped with the "sending warm thoughts your way" phrase and then a stamped off heart in true thyme ink. I added another shimmery piece if organza ribbon for added interest.

Friday, December 29, 2006

I like it...a latte!


tee hee! (sorry, couldn't help myself). I have been just itching to get my hands on this set. I knew I wanted to use the pink and brown theme (as that is my most favoritest colours ever! LOL). I stamped the mug in close to cocoa ink onto whisper white cs. Stamped the heart in pixie pink and popped it up onto dimensionals. I stamped the whipped cream in basic black so I could follow the lines with the liquid applique, added the steam in creamy caramel and sponged the edges with pixie pink. The main card base is blush blossom and then the brown layer is a non-SU! cs (I am actually out of close to cocoa cs....total mind blow!) I stamped the coffee beans stamp in choc. chip all over. I added a few more layers of blush blossom and choc. chip cs and then added some yummy Basic Grey paper (this one is from the Lily Kate line and it is sooooo scrumptious!). I used my new corner ticket punch and added some brads. I matted the main stamped image onto more of the non SU! brown added a little tab with the "thanks" from the everyday flexible phrases set (distressed it using walnut stain from Tim Holtz) and then masked some of the words so I had the "a latte" phrase and stamped that in close to cocoa ink. Added some tasty May Arts ribbon and the card was complete.

This will be sent out to my Sister-in-law as a thank you for hosting Christmas at her house this year and inviting our family. I love this card and almost hate to see it go but, I know she will appreciate it...lol.
Thanks for checking in!

Thursday, December 28, 2006

Santa Clause was here!!!


Wow!! Just look at this haul of supplies I got: Supplies tote bag in the delicious brown/green combo I have been dreaming about (hee hee).

5 new stamp sets (dotted bg, hip hip hooray, like it a latte, eat cake and think big), 3 ink pads (true thyme, buckaroo blue and more mustard), 2 way liquid glue pen, liquid applique, glue dots, 2 boxes eyelets and brads, 2 punches (ticket corner punch and horizontal slot punch), crop-o-dial, 3 packs of paper (choc. chip, cool caribbean and more mustard), dimensionals, and double sided tape! I'm so giddy and cannot wait too bust in any play...tee hee! I just need to find the time now!

I hope everyone had a wonderful Holiday and I would love to hear what you all received! Next time I pop in I hope I will have something fun to share!

Saturday, December 23, 2006

Just wanted....


To wish everyone a very Merry Christmas. We are leaving for the mainland on a ferry this evening so will not have any access to my blog until late next week. So wanted to send my wishes out early. I hope Santa is good to everyone and spoils each of you tonnes. Spend lots of time enjoying the season, family, friends and magic. This is my favorite time of year and I cannot wait to take my little one out to look at all the beautiful lights.

On another note, do you ever get a vision for a card and no matter what you do it just doesn't execute properly?? Well, this little baby was one of those. My brother is dealing with kidney stones so I wanted to make him a get well card. I borrowed the "quick thinking" sentiments and those were a must for me to use. I tried to build the rest of the card around that. I got the idea of using the cup from thanks a latte as a soup bowl and placing it on the scooter from "a wheel thing" and my friend came up with the idea of having one of the chickens from "best of cluck" peeking out of the bowl. I stamped the soup bowl in close to cocoa and cut off the handle and popped it up on dimensionals. I coloured the scooter with markers (artichoke and choc. chip) and stamped it onto natural ivory cs. I originally stamped the chicken in choc. chip but it did not come out well so I used a sakura pen to finish drawing him and just went over the rest of the lines (that was the beginning of the problems...lol. he looks terrible). For the base of the card I used more mustard and then stamped cocoa on canvas for the bg (I stamped off for a softer and more worn look). I added a piece of Basic Grey paper from the fruit cake line. I mounted the main image on artichoke and real red cs. (I distressed the edges of the red cs so it wasn't so vibrant and matched the pp a little better). I paper pierced the edges of the red cs as well. I splattered the main image, distressed the edges with ink and a paper scraper. Stamped the quick thinking sentiment in choc. chip ink and then added some twine .

I can't say I am terribly happy with it but I guess they say simple is sometimes better right?

Tuesday, December 19, 2006

Peaceful Wishes...


I am totally in love with this set. I borrowed this set from a friend of mine and it is just so fun tho play with. I started out by stamping the choc. chip base with the boughs stamp in choc. chip ink, and added the weathered background over top. I stamped the main image onto natural ivory cs using artichoke ink and then added candy cane stickles for the berries. I coloured the sentiment stamp using choc. chip marker so I could seperate it. I stamped the weathered bg in creamy caramel (stamped off once so it wasn't so harsh) over the main stamped image. I matted this in artichoke cs. I stamped a piece of close to cocoa cs in the weathered bg as well. I added 2 biggie brads for added interest and also added a little piece of gingham ribbon to add a touch of "old world class". I think this set is just gorgeous and could be very versatile.

Friday, December 15, 2006

Best blossoms...


Who new when I got this set for last years sell-a-bration promo that I would use it soooo much. I really love this set! I find it very versatile. Anyways...on with the show. I whipped this up last night as the inspiration hit and I figured I had better make it while power was still available...lol. I started with a rose red base and then stamped paisley in artichoke onto natural ivory cs (I love that cardstock). I don't know if anyone else finds this but, I find that the paisley bg does seem to need a lot of ink for a nice coverage. Most of my other backgrounds I can ink up with my brayer but this one I find the best coverage is to pat the ink pad directly onto the stamp. I then matted the paisley piece onto artichoke cs. The main image I stamped the trio flower stamp from the best blossoms set onto natural ivory cs in rose red ink and then used my stamp positioner to get the stems into the right spots (stamped in artichoke ink). I distressed the edges using Tim Holtz distress ink (antique linen). I matted the main image onto artichoke and rose red cs, stamped the words "special" and "friend" in artichoke ink (stamps from the everyday flexible phrases set) and raised it using dimensionals. I took the smallest circle tag size from Making memories tag sets and stamped and cut out one of the blossoms. I stamped the word "hope" over the blossom in artichoke. I tied the tag onto some sheer ribbon I picked up at the dollar store.

I made this for an acquaintance at work who is going through a really tough time and wanted to let her know that she is special and she does have someone who will listen to her troubles.

Thursday, December 14, 2006

So sick of storms....

LOL, seriously. Our area was hit with a storm Monday and we just got power this afternoon! another 4 days without power is seriously taking a toll on my Christmas projects! When our power is out at our home we actually have to leave and go to my Grandmas house because at least if her power goes out she has a wood stove to keep us all warm. (We are on an electric well so when our power is out, we don't even have running water!). As it stands now, she is actually still without power! We are supposed to be hit with another BIG storm late this evening and it is supposed to hang around until noon tomorrow so I would not be surprise if we lose power here again. So, needless to say, I have no new cards to share. (insert sad frown here). Hopefully if the power stays on I can get something fun whipped up.

Stay warm and comfy....

Wednesday, December 06, 2006

Elegent paisley...


I just love the new paisley background stamp. I just received it so wanted to play a little. I'm sure you are all getting sick of my "lovely as a tree" set but I still had a few more images left over so I figured why not use them up. The tree is stamped using markers (always artichoke and choc. chip) onto natural ivory cs and highlighted with a versamark pen and sprinkled with some sparkly emboss powder. I distressed the edges with Vandyke brown from Nick Bantock distress inks and matted the image onto true thyme and cranberry crisp cs. I stamped paisley in cranberry crisp ink onto natural ivory cs. This background has almost a fabric texture look to it (it makes you want to touch it to see if it really is fabric...lol). I matted the paisley piece onto true thyme and adhered it to the cranberry base. I added a little of the holiday designer paper. I stamped the riveting set (hostess set) in versamark and emnbossed it in silver onto thyme cs. I punched it out and then had to manually cut the center out (I don't have the small punch for the inside...definatly need to get one, cutting it manually was too intense). I tied the rivet with stitched grosgrain and put the rivet on pop dots for dimension. I love how this one turned out...so festive and warm.

Sunday, December 03, 2006

Hot chocolate in a card??


Could it be true...well, just check out these little beauties...
The sketch of this layout is from the Splitcoast sketch challenge and the idea for the hot chocolate packs came from texasjodylynn I thought her idea was brilliant and a wonderful opportunity to make a fun holiday card for my niece and nephew.

For the reindeer one I started with true thyme cs and used some of the holiday designer paper (i am in love with this paper, I wish I had bought more of it). I matted the designer paper onto bashful blue cs. I stamped the reindeer in basic black and then coloured them with my prisma pencile crayons and gamsol. I had to water colour the little blankets on their backs with cranberry crisp ink and then added some stickles for a little "bling". I matted the reindeer onto cranberry crisp ink and punched the corners to give it the ticket punch look, added some brads in the corners to finish the look. Used my last scrap of stitched gingham (good thing I have more coming in the mail seeing as this ribbon is not in the winter mini!). I added the ties on the card to tie it closed. Hot glued the hot chocolate packet into the card and added some candy cane stickles in the center of the designer paper. Stamp set is Sleigh full of toys.

The second one is a cranberry crisp base with more designer paper matted onto true thyme cs. I stamped the sleigh onto natural ivory cs using basic black ink and coloured it in with markers. I distressed the edges with direct to paper technique using creamy caramel ink. I matted the sleigh onto cranberry crisp and true thyme cs. Added the stitched grosgrain for the ties. And finished it off with stickles on the bows of the presents in the sleigh.

These were so fun to make and could be done up for bath packets, moisturizer, etc. all sorts of fun little ideas.